So I'm setting up a new Windows Deployment Server with MDT and have decided to try out the database function on it. To get started all you have to do is install SQL express on the server and then while in the Microsoft Deployment Toolkit crate a new database and note down what its called.
Now if your running the same kind of network I am you've got hundreds of computers and adding them one by one into the database and then going into the details and further adding information into the hundred or so fields is just not realistic, so what can you do. Well this is a very nice script that I've knocked up and it will read the contents of a CSV file and import the settings into the database.
First things first. You need to download the modules and import them into powershell. You can download the modules from Microsoft from HERE. Once done create a folder called scripts or something and then extract the files to that folder. Now go into MDT and open up your database, click on 'Computers' and on the right choose 'new'. It doesn't matter if its real or not I just want you to see the details. Click on the details tab, and see all the options on the left hand side. These can all be headers in your CSV file. Now create your CSV file with the headers of Name, Mac, Assettag and continue with the headers from the details section when you add a new computer into the database. Once you fill in the CSV and saved it you can populate the database. Try it with just a couple of computers in the CSV file to start with. You can always delete them if it doesn't work.
First change the file extension on the CSV file to .TXT. So in the below example i've changed mine to 'machines.txt'
Now copy the below script into Notepad and save it as a .ps1 file. This will let you open it with powershell.
You'll need to change the SERVERNAME to your servers name and DATABASENAME to what ever your called your database.
Import-Module –name C:\Scripts\MDTDB.psm1
Connect-MDTDatabase –sqlServer SERVERNAME –instance SQLEXPRESS –database DATABASENAME
$machines = Import-Csv C:\scripts\machines.txt
For ($i=1; $i -le $machines.count; $i++)
{
New-MDTComputer -macAddress $machines[$i-1].mac -AssetTag $machines[$i-1].AssetTag -description $machines[$i-1].description -settings @{
OSInstall='YES';
OSDComputerName=$machines[$i-1].Name;
OrgName='My ORG'
DomainAdmin=$machines[$i-1].DomainAdmin;
DomainAdminDomain=$machines[$i-1].DomainAdminDomain;
DomainAdminPassword=$machines[$i-1].DomainAdminPassword;
JoinDomain=$machines[$i-1].JoinDomain;
_SMSTSORGNAME=$machines[$i-1]._SMSTSORGNAME;
AdminPassword=$machines[$i-1].AdminPassword;
Home_page=$machines[$i-1].Home_Page;
ProductKey=$machines[$i-1].ProductKey
ServerA=$machines[$i-1].ServerA;
TaskSequenceID=$machines[$i-1].TaskSequenceID;
UserDomain=$machines[$i-1].UserDomain;
UserID=$machines[$i-1].UserID;
UserPassword=$machines[$i-1].UserPassword;
KeyboardLocale=$machines[$i-1].KeyboardLocale;
SystemLocale=$machines[$i-1].SystemLocale;
UILanguage=$machines[$i-1].UILanguage;
UserLocale=$machines[$i-1].UserLocale;
SkipAdminPassword=$machines[$i-1].SkipAdminPassword;
SkipApplications=$machines[$i-1].skipApplications;
SkipBitLocker=$machines[$i-1].SkipBitLocker;
SkipBitLockerDetails=$machines[$i-1].SkipBitLockerDeatils;
SkipBuild=$machines[$i-1].SkipBuild;
SkipCapture=$machines[$i-1].SkipCapture;
SkipComputerBackup=$machines[$i-1].SkipComputerBackup;
SkipComputerName=$machines[$i-1].SkipComputerName;
SkipDeploymentType=$machines[$i-1].SkipDeploymentType;
SkipDestinationDisk=$machines[$i-1].SkipDestinationDisk;
SkipDomainMembership=$machines[$i-1].SkipDomainMembership;
SkipFinalSummary=$machines[$i-1].SkipFinalSummary;
SkipLocaleSelection=$machines[$i-1].SkipLocaleSelection;
SkipPackageDisplay=$machines[$i-1].SkipPackageDisplay;
SkipProductKey=$machines[$i-1].SkipProductKey;
SkipSummary=$machines[$i-1].SkipSummary;
SkipTaskSequence=$machines[$i-1].SkipTaskSequence;
SkipTimeZone=$machines[$i-1].SkipTimeZone;
SkipUserData=$machines[$i-1].SkipUserData;
SkipWizard=$machines[$i-1].SkipWizard;
}
}
You can customize this script all you want. Uts very easy. The main section simply lists all the headers i've chosen to import into the database. Make sure they are all in your CSV/TXT file or you'll have a load of missing information
Showing posts with label WDS. Show all posts
Showing posts with label WDS. Show all posts
Friday, June 01, 2012
Thursday, April 12, 2012
Deploying a Windows 7 image with WDS and MDT 2010 - Part 3
This is the final part of the installment. Here you will learn how to install software after you PC has been imaged. For part 1 click here and for part 2 click here


 In the above picture I have also
added a restart computer command and
then a second install application
command. To do this you simply click the add button at the top of the task
sequence and then choosing the option. I find it better to add a restart after
it installs the software as most require a restart to work.
In the above picture I have also
added a restart computer command and
then a second install application
command. To do this you simply click the add button at the top of the task
sequence and then choosing the option. I find it better to add a restart after
it installs the software as most require a restart to work.
I hope you've found all this useful.
Adding Applications
You may want the server to install
certain software automatically after you have installed the image. It may be
because software is only needed in a certain room or you have a problem with
the anti-virus connecting if you don’t install it after an image is deployed. I
will run through this now.
First adding software to the
application list.
Still in MDT workbench, right click
on the applications box and choose New Application.

Choose the option most applicable to
you but I normally go with ‘Application with source files’
On the next box fill in the
appropriate information

On the next screen, browse to the
software folder and click next
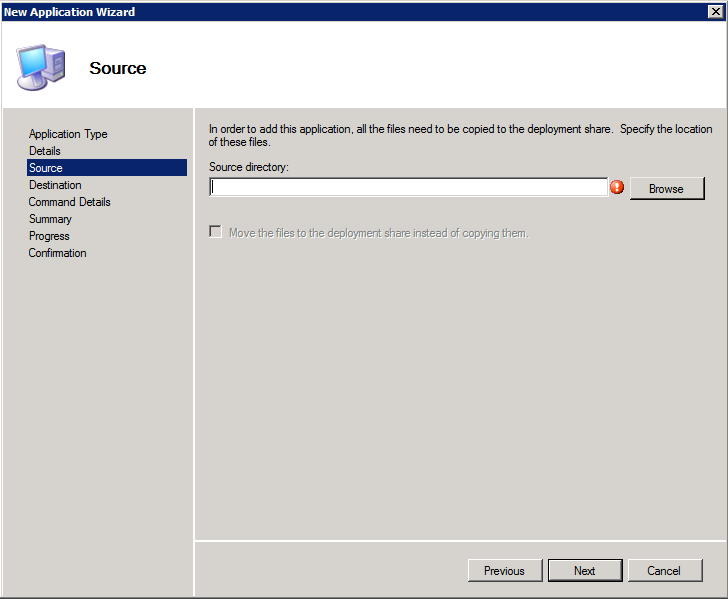
Next specify the name of the folder
to be created

Next specify the command you wish to
run. This will normally be setup.exe or install.msi. You can also specify
command line parameters. You will have to check if any apply to the install
file but normally /s will do silently etc. you may even be able to pass a
command file to the executable to fill in all the information.

Then click next and finish. The
computer will copy across all the files that are in the directory and you will
be able to see it in the applications
box in MDT.
Adding the software to a task sequence.
Click back onto the task sequence box
in MDT and right click on the task sequence you wish to have install the
software. Now choose properties. On the box that pops up choose the second tab
called task sequence. What you see here is a complete breakdown of what the
computer will do.
Under the sub folder ‘state restore’
there will be an option called install applications. If you click on this, you
will have two options on the right. Choose ‘install single application’. You
can then click on browse and choose which application you want.
 In the above picture I have also
added a restart computer command and
then a second install application
command. To do this you simply click the add button at the top of the task
sequence and then choosing the option. I find it better to add a restart after
it installs the software as most require a restart to work.
In the above picture I have also
added a restart computer command and
then a second install application
command. To do this you simply click the add button at the top of the task
sequence and then choosing the option. I find it better to add a restart after
it installs the software as most require a restart to work.
With all this done. You will need to
update the deployment share. To do this you will need to go into the MDT
workbench software, right click on ‘MDT DeploymentShare’ subfolder and then
choose ‘update deploymentshare’. Leave everything as the default and click
next, next and then finish. You should be able to see if the computer has
updated the boot files. If it has then you will need to change them on the WDS
software. I will go through this now.
Updating the boot file in WDS
Run the ‘windows deployment services’
program. On the left hand side click on the server and then the boot folder. In
this you will be able to see all the boot files available. Right click on the
boot folder and choose ‘Add boot image’
On the first box that comes up browse
to the newly created lite touch boot image. These are normally stored under your 'DeploymentshareFolder\boot' folder and are called “LiteTouchPE_x86”. Then click next.
You can then change its name to
something else (up to you), and then click next. Click next again and the boot
image will be installed.
Once this is all done you are ready
to deploy the image.
Reboot the computer and pxe boot to
the boot images. Choose the one you want and let it load. It should ask you for
authentication ( you will need to provide your root account details) and then
the computer name. After this everything is automatically done and you should
have no problems.
Deploying a Windows 7 image with WDS and MDT 2010 - Part 2
This post will follow on from the previous part. You can find it here.


Creating a task Sequence
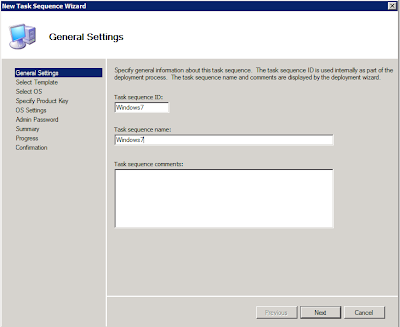
Open up MDT workbench and right click
on the task sequence box. Then choose ‘new task sequence’.
On the first screen of the wizard add
the task sequence ID (must be unique) and the task sequence name (so you know
which it is) and click next.

On the next screen choose ‘standard
task sequence’

On the next screen choose the basic
windows 7 files.

On the next screen choose the second
option and specify the MAK

On the next screen fill in the three
text boxes with the appropriate information.

On the next screen, fill in the
Administrator password

Finally choose next and then finish.
Your task sequence will be created. The ID of this task sequence should be
included in the’customsetting.ini’ file that we talked about earlier.
Ok, so that's part 2 over with. In the final part of this series you'll find out how to install software and how to finish it all off.
Deploying a Windows 7 image with WDS and MDT 2010 - Part 1
This post will tell you about the process of deploying an image using WDS and MDT. It expects you have a set up and working WDS server, and the base Windows 7 OS already installed.
First log onto the WDS server as you
will need to edit a few files first.
Go to the deployment share and
go into the 'control 'folder.
The first file you will need to edit
is ‘bootstrap.ini’. The correct text in the file should look like this.
[Settings]
Priority=Default
[Default]
DeployRoot=\\WDSSERVER\DeploymentShareFolder
SkipBDDWelcome=YES
SkipBDDWelcome
– skips the welcome screen when you boot into winPE. This can be changed
DeployRoot –
The path to the deployment share. This will need to be changed.
The second file is called
‘customsettings.ini’. The correct text should look like this.
[Settings]
Priority=Default
Properties=MyCustomProperty
[Default]
OSInstall=YES
SkipAppsOnUpgrade=YES
skipBDDWelcome=YES
SkipCapture=yes
SkipAdminPassword=YES
SkipProductKey=YES
SkipAppsOnUpgrade=YES
SkipCapture=YES
ComputerBackupLocation=\\WDSSERVER\deploymentshareFolder\Backup
BackupFile=MyCustomImage.wim
SkipAdminPassword=YES
SkipDeploymentType=YES
SkipDomainMembership=YES
JoinDomain=NameOfYourDomain
DomainAdmin=UserNameToJoinDomain
DomainAdminDomain=DomainName
DomainAdminPassword=PasswordOfUserToJoinDomain
SkipUserData=Yes
SkipTaskSequence=YES
TaskSequenceID=IDOfTaskSequence
SkipComputerName=NO
OSDComputerName=%SerialNumber%
SkipPackageDisplay=YES
SkipLocaleSelection=YES
UILanguage=en-UK
UserLocale=en-UK
KeyboardLocale=0809:00000809
SkipTimeZone=YES
TimeZoneName=GMT Standard Time
SkipApplications=YES
SkipBitLocker=YES
SkipSummary=YES
CaptureGroups=YES
SLShare=\\WDSSERVER\deploymentshareFolder\Logs
Home_page=HomePageForWebBrowser
_SMSTSORGNAME = Your Organisations Name
Most of these options (all of which
are changeable) are self explanatory. I will point
out TaskSequenceID. You will need to
change this to which ever task sequence you wish to use. A list is provided in
the MDT workbench.
All of the ones marked in red you will certainly need to change but you can change everything. Also note that the Locale is set up for UK and UK English. You'll need to change that depending on where in the world you are.
Remember to
save both files when you finish editing them.
Now if you go back to the ‘control’
folder, you should see folders which have the names of the images you wish to
deploy. If you choose the image you wish to deploy and go into the folder you
will see 2 files. A ‘ts.xml’ and a ‘unattended.xml’. It is the ‘unattended.xml’
file you want to edit so open it up. This is where the computer gets the
information from to set up the computer so you don’t have to stay there and
provide it.
The windows system image manager
should open up and in the centre pane will have a list of options.

Each
one of these can be customized. You will need to go through each one of these
to make sure it is customize to the image you will be using it with.
Subscribe to:
Posts (Atom)