We've just had a new building built, with lots of nice new rooms for members of staff to live in. Naturally current staff have already staked their claims to rooms, and as such its up to IT Services to move the computer equipment over to the new offices.
Obviously we've done this a few times before and we usually forget to change where the computers are in Active Directory. If you've got a structure based on room layout, then when a computer moves rooms or even to a different building then it needs moving in Active Directory as well. Like I said, we usually forget to move them, as we're normally very busy.
So I've been going round the net trying to find some free software that will pop up when one of IT log on to ask if we want to move the computer. Personally I didn't like any of them, so I decided to write my own in AutoIt.
This little program is based on the examples given in AD.au3 pack that I've talked about before. The program will start when a member of IT services logs on, and will initially ask if the computer they have logged on to has been moved. 'No' will exit the program, but 'yes' will taken them to a GUI with their Active Directory tree structure. If you then browse to the OU that you want the computer to be moved to and click 'Move Computer' it will move it for you. If you click Exit instead, the program will end. It will pop up with 2 confirmation boxes, the first checking that it is correct and the second will tell you either if its successful, or if it failed. Here's the code
#AutoIt3Wrapper_AU3Check_Parameters= -d -w 1 -w 2 -w 3 -w 4 -w 5 -w 6
#AutoIt3Wrapper_AU3Check_Stop_OnWarning=Y
#include <AD.au3>
#include <TreeviewConstants.au3>
#include <WindowsConstants.au3>
#include <GUIConstants.au3>
#include <GuiTreeView.au3>
#include <ButtonConstants.au3>
#include <GUIConstantsEx.au3>
_AD_Open()
Global $Reply = MsgBox(4,"Moved computer", "Have you moved this computer?")
If $Reply <> 6 Then Exit
Global $newOU = ""
Global $sTitle = "Move that stupid Computer v1.3"
Global $hMain = GUICreate($sTitle, 743, 683, -1, -1)
Global $IObject = GUICtrlCreateInput(_AD_SamAccountNameToFQDN(@ComputerName& "$"), 8, 30, 559, 21)
Global $hTree = GUICtrlCreateTreeView(6, 100, 600, 400, -1, $WS_EX_CLIENTEDGE)
Global $bExit = GUICtrlCreateButton("Exit", 624, 8, 97, 33)
Global $BOK = GUICtrlCreateButton("Move Computer", 624, 200, 97, 33)
Global $aTreeView = _AD_GetOUTreeView($newOU, $hTree)
GUICtrlCreateLabel("Object to move (FQDN or sAMAccountName):", 8, 10, 231, 17)
GUISetState(@SW_SHOW)
While 1
Global $nMsg = GUIGetMsg()
Switch $nMsg
Case $GUI_EVENT_CLOSE, $BExit
Exit
Case $BOK
Global $sObject = GUICtrlRead($IObject)
$hSelection = _GUICtrlTreeView_GetSelection($hTree)
$sSelection = _GUICtrlTreeView_GetText($hTree, $hSelection)
For $i = 1 To $aTreeView[0][0]
If $hSelection = $aTreeView[$i][2] Then ExitLoop
Next
$sOU = $aTreeView[$i][1]
msgbox(1,"","Currently - "&$sObject&" target - "&$sOU)
ExitLoop
EndSwitch
WEnd
; Move object
Global $iValue = _AD_MoveObject($sOU, $sObject)
If $iValue = 1 Then
MsgBox(64, "Active Directory Functions - Example 1", "Object '" & $sObject & "' successfully moved to '" & $sOU & "'")
ElseIf @error = 1 Then
MsgBox(64, "Active Directory Functions - Example 1", "Target OU '" & $sOU & "' does not exist")
ElseIf @error = 2 Then
MsgBox(64, "Active Directory Functions - Example 1", "Object '" & $sObject & "' does not exist")
Else
MsgBox(64, "Active Directory Functions - Example 1", "Return code '" & @error & "' from Active Directory")
EndIf
_AD_Close()
Func _AD_GetOUTreeView($sAD_OU, $hAD_TreeView, $bAD_IsADOpen = True)
If $bAD_IsADOpen = False Then
_AD_Open()
If @error Then Return SetError(@error, @extended, 0)
EndIf
$sSeparator = "\"
Local $aAD_OUs = _AD_GetAllOUs($sAD_OU, $sSeparator)
If @error <> 0 Then Return SetError(@error, @extended, 0)
Local $aAD_TreeView[$aAD_OUs[0][0] + 1][3] = [[$aAD_OUs[0][0], 3]]
For $i = 1 To $aAD_OUs[0][0]
$aAD_Temp = StringSplit($aAD_OUs[$i][0], $sSeparator)
$aAD_TreeView[$i][0] = StringFormat("%" & $aAD_Temp[0] - 1 & "s", "") & "#" & $aAD_Temp[$aAD_Temp[0]]
$aAD_TreeView[$i][1] = $aAD_OUs[$i][1]
Next
If $bAD_IsADOpen = False Then _AD_Close()
_GUICtrlTreeView_BeginUpdate($hAD_TreeView)
Local $ahAD_Node[50]
For $iAD_Index = 1 To $aAD_TreeView[0][0]
$sAD_Line = StringSplit(StringStripCR($aAD_TreeView[$iAD_Index][0]), @TAB)
$iAD_Level = StringInStr($sAD_Line[1], "#")
If $iAD_Level = 0 Then ExitLoop
If $iAD_Level = 1 Then
$ahAD_Node[$iAD_Level] = _GUICtrlTreeView_Add($hAD_TreeView, 0, StringMid($sAD_Line[1], $iAD_Level + 1))
$aAD_TreeView[$iAD_Index][2] = $ahAD_Node[$iAD_Level]
Else
$ahAD_Node[$iAD_Level] = _GUICtrlTreeView_AddChild($hAD_TreeView, $ahAD_Node[$iAD_Level - 1], StringMid($sAD_Line[1], $iAD_Level + 1))
$aAD_TreeView[$iAD_Index][2] = $ahAD_Node[$iAD_Level]
EndIf
Next
_GUICtrlTreeView_EndUpdate($hAD_TreeView)
Return $aAD_TreeView
EndFunc
It should work for you, I see no reason why not, but please remember that this will change your Active Directory. Please make sure you test it first. I'm not being held responsible for messing up your AD.
Thursday, April 19, 2012
Thursday, April 12, 2012
Deploying a Windows 7 image with WDS and MDT 2010 - Part 3
This is the final part of the installment. Here you will learn how to install software after you PC has been imaged. For part 1 click here and for part 2 click here


 In the above picture I have also
added a restart computer command and
then a second install application
command. To do this you simply click the add button at the top of the task
sequence and then choosing the option. I find it better to add a restart after
it installs the software as most require a restart to work.
In the above picture I have also
added a restart computer command and
then a second install application
command. To do this you simply click the add button at the top of the task
sequence and then choosing the option. I find it better to add a restart after
it installs the software as most require a restart to work.
I hope you've found all this useful.
Adding Applications
You may want the server to install
certain software automatically after you have installed the image. It may be
because software is only needed in a certain room or you have a problem with
the anti-virus connecting if you don’t install it after an image is deployed. I
will run through this now.
First adding software to the
application list.
Still in MDT workbench, right click
on the applications box and choose New Application.

Choose the option most applicable to
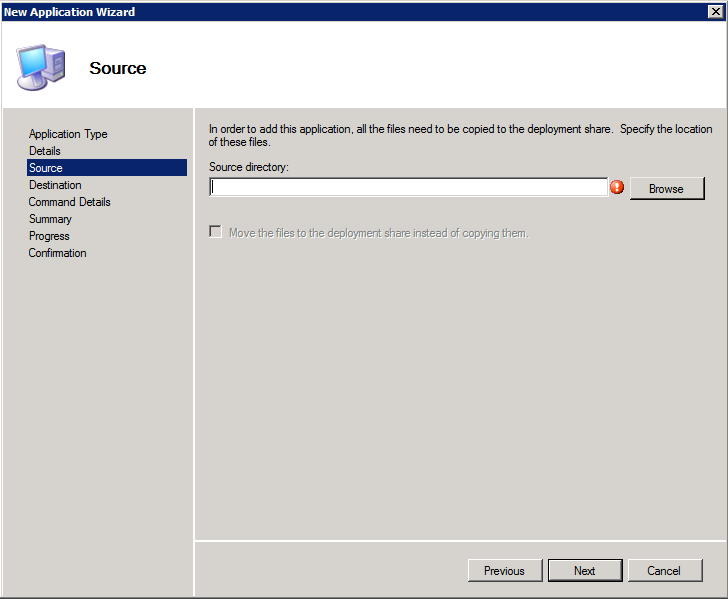
you but I normally go with ‘Application with source files’
On the next box fill in the
appropriate information

On the next screen, browse to the
software folder and click next
Next specify the name of the folder
to be created

Next specify the command you wish to
run. This will normally be setup.exe or install.msi. You can also specify
command line parameters. You will have to check if any apply to the install
file but normally /s will do silently etc. you may even be able to pass a
command file to the executable to fill in all the information.

Then click next and finish. The
computer will copy across all the files that are in the directory and you will
be able to see it in the applications
box in MDT.
Adding the software to a task sequence.
Click back onto the task sequence box
in MDT and right click on the task sequence you wish to have install the
software. Now choose properties. On the box that pops up choose the second tab
called task sequence. What you see here is a complete breakdown of what the
computer will do.
Under the sub folder ‘state restore’
there will be an option called install applications. If you click on this, you
will have two options on the right. Choose ‘install single application’. You
can then click on browse and choose which application you want.
 In the above picture I have also
added a restart computer command and
then a second install application
command. To do this you simply click the add button at the top of the task
sequence and then choosing the option. I find it better to add a restart after
it installs the software as most require a restart to work.
In the above picture I have also
added a restart computer command and
then a second install application
command. To do this you simply click the add button at the top of the task
sequence and then choosing the option. I find it better to add a restart after
it installs the software as most require a restart to work.
With all this done. You will need to
update the deployment share. To do this you will need to go into the MDT
workbench software, right click on ‘MDT DeploymentShare’ subfolder and then
choose ‘update deploymentshare’. Leave everything as the default and click
next, next and then finish. You should be able to see if the computer has
updated the boot files. If it has then you will need to change them on the WDS
software. I will go through this now.
Updating the boot file in WDS
Run the ‘windows deployment services’
program. On the left hand side click on the server and then the boot folder. In
this you will be able to see all the boot files available. Right click on the
boot folder and choose ‘Add boot image’
On the first box that comes up browse
to the newly created lite touch boot image. These are normally stored under your 'DeploymentshareFolder\boot' folder and are called “LiteTouchPE_x86”. Then click next.
You can then change its name to
something else (up to you), and then click next. Click next again and the boot
image will be installed.
Once this is all done you are ready
to deploy the image.
Reboot the computer and pxe boot to
the boot images. Choose the one you want and let it load. It should ask you for
authentication ( you will need to provide your root account details) and then
the computer name. After this everything is automatically done and you should
have no problems.
Deploying a Windows 7 image with WDS and MDT 2010 - Part 2
This post will follow on from the previous part. You can find it here.


Creating a task Sequence
Open up MDT workbench and right click
on the task sequence box. Then choose ‘new task sequence’.
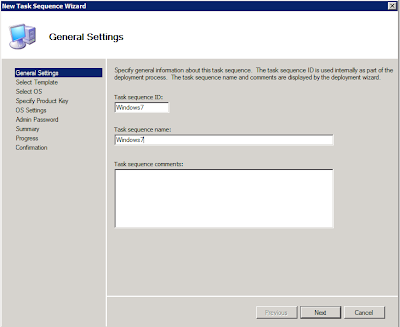
On the first screen of the wizard add
the task sequence ID (must be unique) and the task sequence name (so you know
which it is) and click next.

On the next screen choose ‘standard
task sequence’

On the next screen choose the basic
windows 7 files.

On the next screen choose the second
option and specify the MAK

On the next screen fill in the three
text boxes with the appropriate information.

On the next screen, fill in the
Administrator password

Finally choose next and then finish.
Your task sequence will be created. The ID of this task sequence should be
included in the’customsetting.ini’ file that we talked about earlier.
Ok, so that's part 2 over with. In the final part of this series you'll find out how to install software and how to finish it all off.
Deploying a Windows 7 image with WDS and MDT 2010 - Part 1
This post will tell you about the process of deploying an image using WDS and MDT. It expects you have a set up and working WDS server, and the base Windows 7 OS already installed.
First log onto the WDS server as you
will need to edit a few files first.
Go to the deployment share and
go into the 'control 'folder.
The first file you will need to edit
is ‘bootstrap.ini’. The correct text in the file should look like this.
[Settings]
Priority=Default
[Default]
DeployRoot=\\WDSSERVER\DeploymentShareFolder
SkipBDDWelcome=YES
SkipBDDWelcome
– skips the welcome screen when you boot into winPE. This can be changed
DeployRoot –
The path to the deployment share. This will need to be changed.
The second file is called
‘customsettings.ini’. The correct text should look like this.
[Settings]
Priority=Default
Properties=MyCustomProperty
[Default]
OSInstall=YES
SkipAppsOnUpgrade=YES
skipBDDWelcome=YES
SkipCapture=yes
SkipAdminPassword=YES
SkipProductKey=YES
SkipAppsOnUpgrade=YES
SkipCapture=YES
ComputerBackupLocation=\\WDSSERVER\deploymentshareFolder\Backup
BackupFile=MyCustomImage.wim
SkipAdminPassword=YES
SkipDeploymentType=YES
SkipDomainMembership=YES
JoinDomain=NameOfYourDomain
DomainAdmin=UserNameToJoinDomain
DomainAdminDomain=DomainName
DomainAdminPassword=PasswordOfUserToJoinDomain
SkipUserData=Yes
SkipTaskSequence=YES
TaskSequenceID=IDOfTaskSequence
SkipComputerName=NO
OSDComputerName=%SerialNumber%
SkipPackageDisplay=YES
SkipLocaleSelection=YES
UILanguage=en-UK
UserLocale=en-UK
KeyboardLocale=0809:00000809
SkipTimeZone=YES
TimeZoneName=GMT Standard Time
SkipApplications=YES
SkipBitLocker=YES
SkipSummary=YES
CaptureGroups=YES
SLShare=\\WDSSERVER\deploymentshareFolder\Logs
Home_page=HomePageForWebBrowser
_SMSTSORGNAME = Your Organisations Name
Most of these options (all of which
are changeable) are self explanatory. I will point
out TaskSequenceID. You will need to
change this to which ever task sequence you wish to use. A list is provided in
the MDT workbench.
All of the ones marked in red you will certainly need to change but you can change everything. Also note that the Locale is set up for UK and UK English. You'll need to change that depending on where in the world you are.
Remember to
save both files when you finish editing them.
Now if you go back to the ‘control’
folder, you should see folders which have the names of the images you wish to
deploy. If you choose the image you wish to deploy and go into the folder you
will see 2 files. A ‘ts.xml’ and a ‘unattended.xml’. It is the ‘unattended.xml’
file you want to edit so open it up. This is where the computer gets the
information from to set up the computer so you don’t have to stay there and
provide it.
The windows system image manager
should open up and in the centre pane will have a list of options.

Each
one of these can be customized. You will need to go through each one of these
to make sure it is customize to the image you will be using it with.
Wednesday, April 11, 2012
How to do a manual install of MySQL on Windows 7
I've been having great problems with MySQL lately. It seems no matter what I do it throws up errors when ever I try to install it through the MSI file that it provides. I wont go into details here on the problems that I've been having. Simply put I'd had enough and I did it manually. Here's how I did it.
First download the zip file with the latest copy of MySQL in. You can get it here Remember, if there are two of them, you want the larger one.
Once downloaded you can unzip the files and place them in a folder on your C drive called 'mysql'.
Now, looking online there are several configuration methods available but I found the simplest way was to just create a new text document in the C:\mysql folder and rename it 'my.ini' There's tons of stuff you can put in it but I'll leave that up to you to tweak. For now all you need to put in it is -
OK, now we need to test that this has all worked. If you browse to the c:\mysql\bin folder and while holding down shift right click in the folder and choose 'open a command window here'. This will bring up a command prompt. type in -
This should start the MySQL service. If the command prompt just hangs there, don't worry about it. Just close the windows and reopen another command prompt in the same location. Now type in
This will bring up the command line tool for MySQL. One of the most important things you need to do now is change the root password. Type in -
UPDATE mysql.user SET password=PASSWORD("HereIsWhereUSpecifyANewPassword") WHERE User='root';
FLUSH PRIVILEGES;
You will need to make note of this as you will need it to use the command line tool again. Also don't forget the ; at the end of each line.
Still in the command prompt window type
You should now have a normal prompt again. I think its best to install MySQL as a service. This way you wont have to start it every time. To do this, in the same command prompt type in -
You should get a response saying it has been successful. Don't forget to change the new MySQL service to automatic in the services menu for it to start automatically.
First download the zip file with the latest copy of MySQL in. You can get it here Remember, if there are two of them, you want the larger one.
Once downloaded you can unzip the files and place them in a folder on your C drive called 'mysql'.
Now, looking online there are several configuration methods available but I found the simplest way was to just create a new text document in the C:\mysql folder and rename it 'my.ini' There's tons of stuff you can put in it but I'll leave that up to you to tweak. For now all you need to put in it is -
[mysqld]
# installation directory
basedir="C:/mysql/"
# data directory
datadir="c:/mysql/data/"
# installation directory
basedir="C:/mysql/"
# data directory
datadir="c:/mysql/data/"
OK, now we need to test that this has all worked. If you browse to the c:\mysql\bin folder and while holding down shift right click in the folder and choose 'open a command window here'. This will bring up a command prompt. type in -
mysqld
This should start the MySQL service. If the command prompt just hangs there, don't worry about it. Just close the windows and reopen another command prompt in the same location. Now type in
mysql -u root
This will bring up the command line tool for MySQL. One of the most important things you need to do now is change the root password. Type in -
UPDATE mysql.user SET password=PASSWORD("HereIsWhereUSpecifyANewPassword") WHERE User='root';
FLUSH PRIVILEGES;
You will need to make note of this as you will need it to use the command line tool again. Also don't forget the ; at the end of each line.
Still in the command prompt window type
exit;
You should now have a normal prompt again. I think its best to install MySQL as a service. This way you wont have to start it every time. To do this, in the same command prompt type in -
mysqld --install
You should get a response saying it has been successful. Don't forget to change the new MySQL service to automatic in the services menu for it to start automatically.
Thursday, April 05, 2012
Sysprep and Capture a windows image using MDT and WDS
Once your reference computer image has been created, tested
and re-tested, from another computer remote desktop into your Windows Deployment Server
Go to the deployment share and then into the control folder.
Here you will find two files that you will need to edit.
The first file is ‘bootstrap.ini’. The text that is in it
should look like this
[Settings]
Priority=Default
[Default]
DeployRoot=\\WDSSERVER\DeploymentShare$
Where WDSSERVER\DeploymentShare$ is the name of your deployment server shared area
If it does
not, copy and paste this into the file deleting anything else in there.
The second
file is called ‘customsettings.ini’. The text should look like this
[Settings]
Priority=Default
Properties=MyCustomProperty
[Default]
OSInstall=Y
SkipAppsOnUpgrade=YES
SkipCapture=NO
SkipAdminPassword=YES
SkipProductKey=YES
If it does
not, copy and paste this into the file deleting anything else in there.
Remember to
save both these files when closing.
Launch the Microsoft deployment toolkit (MDT) workbench and click on
the task sequence section

In the above image you can see that the task sequence for
‘sysprep and capture ‘ has already been
created. If you do not have it I will quickly run through creating it. If it is
already there you can skip the next section.
SKIP THIS SECTION IF SYSPREP AND
CAPTURE TASK SEQUENCE ALREADY EXISTS
Right click on task sequence in the left hand pane and
choose ‘New Task Sequence’
Give the new sequence an ID and then a name
On the new menu from the drop down box choose ‘sysprep and
capture’ and click next.
When choosing an OS to install with it choose the full
windows 7 professional base files you should have in the list. It should be
called something like “Windows 7 PROFESSIONAL
in Windows 7 x86 install.wim”
Continue to fill in the questions, adding all available
information you can. Then click finish. Don’t forget to update the deployment
share by right clicking on ‘MDT deployment share’ and choosing update
deployment share.
CONTINUE ON FROM HERE
Unlike previously you do not need to PXE boot to capture the
image.
Go to reference computer (you will need to have connected it
to the domain, but then log off and log on as the local administrator) and map
a drive to \\WDSSERVER\DeploymentShare$\Scripts
It doesn’t matter what letter you use but you will have to
use your account with domain level permissions
Next open a command prompt and go to that drive letter.
Once in the folder type in this command.
Cscript litetouch.wsf
The
MDT Wizard Screens will launch and prompt for the information required to
complete this task sequence. **Note – we
will still process customsettings.ini for this task sequence. If you have modified customsettings.ini to
skip wizard screens, those settings will be honored with this task sequence as
well
On the first page choose the Sysprep and Capture task
sequence

On the second page choose the capture option and specify the
location to save it and the file name

On the third page put in your domain admin username and
password with the domain name

Finally on the fourth page click begin and the deployment
wizard should start. The computer will automatically go through the whole
process without your input
Once the capture has completed, you
can now import the captured image as a custom image file in MDT and use it for
future task sequences. With MDT still open on the WDS server right click on
“Operating systems” in the left hand pane and choose ‘Import Operating System’

Add new operating system and choose
custom image file.

Point to the “Captures” path and move
it to the to the deployment share.

Include the setup files for the OS
which you are importing and complete the wizards. These again are the base
windows 7 professional files

And there you have it. Your brand new image ready to roll
out.
Tuesday, April 03, 2012
How to convert a WIM file into a VHD
So you've been rolling out your Windows 7 image with all the software on, that you spent ages testing. Then you realise that you want to run this on a virtual machine, except you've spent ages setting this one up and testing and you don't want to have to do it all again. Well Microsoft have thought of this and provide a WIM to VHD convertor.
Before you go any further, I've had great success with this and never once had a problem. This doesn't mean you wont, so probably best to test with a copy of the original WIM file.
With that said, here's how you do it.
First, download and install the AIK from Microsoft. You can download it from here.
Now download the WIM2VHD Convertor. All it is is a WSF file.
Now, copy the folder that your custom WIM image
is in (eg. browse to your deployment server and open \DeploymentShare\Operating Systems\ and copy the entire
folder) and place it on the windows 7 PC.
Now on the windows 7 PC, run a command
prompt as Administrator.
Browse to the folder where the WIM2VHD
script is (WIM2VHD.wsf) and run the following command.
Cscript WIM2VHD.WSF /WIM:C:\source\custom.wim
/SKU:Enterprise /VHD:C:\customwim.vhd
----------------------------------------------------------------------------------------------
“The /WIM:C:\source
folder is where your .wim image is stored. This is changed depending on the
name of the file and where it is.”
“The
/SKU:Enterprise section should be changed depending on what kind of windows 7
operating system the image is based on”
“The
/VHD:C:\customwim.vhd part can be changed to where you want to save the new vhd
file to. Its name can be changed to”
-----------------------------------------------------------------------------------------------
This is all once sentence; only press enter
at the end.
This should run the script and create you a
VHD file.
Can my company read my emails?
Recently I was asked to investigate a employees use of the work email system. Which lead me on to a the question of whether I could read employees emails as they may use it for personal business as well. Now our lawyers say that we can, as anything on the companies systems belongs to the company, but I decided to do a little research on my own and this is what I found out.
First of all your company should have an email policy. If it doesn't I would be very surprised. It should of also have made attempts to bring this to your attention.
The policy should:
Now with that said the company can only look at certain emails in your inbox.
The Regulation of Investigatory Powers Act (2000) prevents anyone without "lawful Authority" from reading an email without the express permission of the sender and receiver.
BUT the Telecommunications Regulations Act (2000) Lists exceptions to this very general rule, which means that a company can monitor business emails, but only to
Now as is usual in the law, step forward the Human Rights Act. Under the Act you have the right to a private life. This extends to a reasonable amount of personal time at work. Don't go crazy, you are getting paid to do work. But the Act has always given you some right of communication while at work. It used to be that you can make and received personal phone calls or write letters. This has been extended now to cover emails. Again, it is a reasonable amount of time. Don't over do it.
First of all your company should have an email policy. If it doesn't I would be very surprised. It should of also have made attempts to bring this to your attention.
The policy should:
- set out clearly when you may or may not use work email for private business;
- make clear what a reasonable use of private business is
- explain why your employer monitors emails, the extent of the monitoring, and the means used;
- outline the penalties you can expect if you breach the policy;
The Regulation of Investigatory Powers Act (2000) prevents anyone without "lawful Authority" from reading an email without the express permission of the sender and receiver.
BUT the Telecommunications Regulations Act (2000) Lists exceptions to this very general rule, which means that a company can monitor business emails, but only to
- ascertain regulatory compliance
- detect unauthorized use
- prevent/detect criminal activity
Now as is usual in the law, step forward the Human Rights Act. Under the Act you have the right to a private life. This extends to a reasonable amount of personal time at work. Don't go crazy, you are getting paid to do work. But the Act has always given you some right of communication while at work. It used to be that you can make and received personal phone calls or write letters. This has been extended now to cover emails. Again, it is a reasonable amount of time. Don't over do it.
Monday, April 02, 2012
AutoIt - Add Users to Active Directory / Creating New Users
So I'm progressing with Autoit quite nicely and I'm trying to get it to add new users to Active Directory. There isn't much info about this on google. I'm guessing that most people use professional software for this task. Well we're cheap here so I've had to come up with my own way of doing it.
So if you want to use the code below, the first thing you'll have to do is download the AD.au3 files and put them all in your 'include' directory.
Now this script will alter your active directory. Please test it first before you do anything. I'm not being held responsible for you messing up your AD.
As you can see in the code below, it takes a list of names from the 'c:\test.txt' file (each name should be on its own line). It then takes this list, creates each one a password and creates a userarea a network drive (I've used Z:\). Then outputs each user a text file containing a welcome message that you can edit, their username and their password. Finally it will add the user to Active Directory.
So here's the code
#include <file.au3>
#include <AD.au3>
#include <GUIConstantsEx.au3>
#include <WindowsConstants.au3>
_AD_Open()
If @error Then Exit MsgBox(16, "Active Directory Script", "Function _AD_Open encountered a problem. @error = " & @error & ", @extended = " & @extended)
Global $Reply = MsgBox(308, "Active Directory Functions", "This script creates a new user in the specified OU." "Are you sure you want to change the Active Directory?")
If $Reply <> 6 Then Exit
$fileopen = "C:\test.txt"
$file = FileOpen($fileopen,0)
for $x = 1 to _FileCountlines($fileopen)
Local $line = FileReadLine($file)
_FileCreate("C:\"&$line&".txt")
$pwd = ""
Dim $aSpace[3]
$digits = 8
For $i = 1 To $digits
$aSpace[0] = Chr(Random(65, 90, 1)) ;A-Z
$aSpace[1] = Chr(Random(97, 122, 1)) ;a-z
$aSpace[2] = Chr(Random(48, 57, 1)) ;0-9
$pwd &= $aSpace[Random(0, 2, 1)]
DirCreate("z:\"&$line&"\Application Data")
DirCreate("z:\"&$line&"\My Documents")
DirCreate("z:\"&$line&"\My Pictures")
DirCreate("z:\"&$line&"\My Videos")
DirCreate("z:\"&$line&"\My Music")
Next
local $WriteFile = FileOpen("C:\"&$line&".txt",1)
$name = StringStripWS($line,8)
FileWriteLine($writefile, "Welcome to WHAT EVER YOUR BUSINESS IS CALLED")
FileWriteLine($writefile, "")
FileWriteLine($writefile, "Username = "& $name)
FileWriteLine($writefile, "Password = "& $Pwd)
FileClose($Writefile)
local $OU = "OU=Staff,OU=Active Users,DC=dcname,DC=local"
Global $iValue = _AD_CreateUser($sOU, $name, $line)
If $iValue = 1 Then
MsgBox(64, "Active Directory Functions", "User '" & $line & "' in OU '" & $sOU & "' successfully created")
ElseIf @error = 1 Then
MsgBox(64, "Active Directory Functions", "User '" & $line & "' already exists")
ElseIf @error = 2 Then
MsgBox(64, "Active Directory Functions", "OU '" & $sOU & "' does not exist")
ElseIf @error = 3 Then
MsgBox(64, "Active Directory Functions", "Value for CN (e.g. Lastname Firstname) is missing")
ElseIf @error = 4 Then
MsgBox(64, "Active Directory Functions", "Value for User is missing")
Else
MsgBox(64, "Active Directory Functions", "Return code '" & @error & "' from Active Directory")
EndIf
Next
AD_Close()
Now a few things to talk about. First it doesn't set permissions on the users folders. You'll have to either write that bit in yourself or do it manually. Secondly it doesn't set the password on Active directory. I haven't worked out how to do this yet, let me know if you figure out how. Thirdly the active directory section, only fills in the basic information. If you look through the AD functions you'll be able to see what else you can add, but this should start you off.
Have fun and try not to break anything.
Subscribe to:
Posts (Atom)